General controls
Assigning a hotkey:
1. Click the button for the action you want to configure.
2. When the button shows Press any key, press the desired key.
3. To clear a hotkey, click the assignment button and then press Escape.
Assigning coordinates:
1. Click a coordinate selection button, such as Set First Cell, Select Cape, or Select Map.
2. A red square or rectangle will appear on the screen.
3. Move it over the required place in the game.
4. Left-click to save the coordinates.
5. To clear existing coordinates, click the coordinate button and then press Escape.
Duplicate hotkey protection:
- DrakenHub prevents the same hotkey from being used for two different action triggers. If a key is already used, a notification appears.
- Service keys inside macros are an exception, for example Target Bar and Skill Slot in Extra Skill. They may repeat because they do not start a macro by themselves.
Hiding and closing the window:
- Insert — hide or show the DrakenHub window.
- End — fully close the program.
- Home — emergency stop for the active macro.
The top-right corner of the window has two buttons:
- Yellow button — hides the window, same as Insert.
- Red button — closes the program, same as End.
Inventory - Sell Bot

The Inventory tab is used to configure selling, melting, the inventory grid, item rarities, and custom user-defined items.
Main buttons in Sell Bot:
- Sell All Tabs — hotkey for full selling. The macro opens the shop, scans selected inventory tabs, sells matching items, and closes the window at the end.
- Sell Current Tab — hotkey for selling only the currently selected tab. This mode does not open the shop and does not close the window after selling. It is meant for cases where the shop is already open and the user selected the tab manually.
Setup:
- Inventory — inventory hotkey. This key is shared by several modules.
- Set Close Inventory — selects the close button of the inventory or shop window. After full selling or melting, DrakenHub clicks this point to close the window.
- Set Bag — selects the first inventory tab. Other tab positions are calculated from this point.
- Set First Cell — selects the first inventory cell. The whole item grid is built from this cell.
Set Close Inventory is selected with a small red square. Click Set Close Inventory, place the square over the close button in the game, and click.
Sell Current Tab does not use Set Close Inventory. This is intentional, so the user can manually switch tabs and continue working.
Shop Setup:
- Skills Tab — the in-game hotkey that opens the Skills window. Usually S by default.
- Wisdom Tab — coordinates of the Wisdom tab inside the Skills window. The bot clicks it after opening Skills Tab.
- Shop Button — coordinates of the shop button inside the Skills window. Clicking it opens the sell interface.
Grid Settings: is a collapsible section for grid and scan settings.
- Show Scan Grid — shows the red inventory grid overlay. Useful for checking whether the grid matches the cells correctly.
- Cell Size — size of one inventory cell.
- Bag Size — size of an inventory tab.
- Cell Gap X — horizontal gap between cells.
- Cell Gap Y — vertical gap between cells.
- Bag Offset X — inventory tab offset.
- Point Picker Size — size of the red picker used when adding color points.
- Scan Level — number of scan passes. Available levels are 1 and 2.:
- 1 — performs one scan pass per tab. It is faster and usually enough for most items.
- 2 — performs a second additional pass. It is useful when the game sometimes ignores one selling click. The second pass helps sell remaining items.
Bags:
The Bags section selects which inventory tabs are used by Sell Bot and Melt Bot.
Any tabs from 1 to 9 can be selected. For example, if only 7 and 8 are enabled, full selling or melting will use only those tabs.
Selected tabs are saved in settings and exported with the full settings profile.
Sell Rarities:
- This section selects which item rarities are used for selling and melting.
- Uncommon — green items.
- Magic — blue items.
- Rare — purple items.
- Epic — orange items.
- Unique — yellow items.
- Set — set items.
The checkbox next to a rarity enables or disables that rarity for Sell Bot and Melt Bot.
Add Point adds a new point.
How to configure a rarity:
1. Enable the checkbox for the rarity.
2. Click Add Point.
3. Move the red picker to a stable part of the question mark or item icon.
4. Click the mouse.
5. Repeat several times on different stable areas of the same item type.
DrakenHub saves the color of the selected point and its position relative to the inventory cell. During scanning, the program checks the same points in every cell. If the points match the saved color samples, the item is considered found.
Remove Last removes only the last added point. This is useful if the last point was selected by mistake.
Clear removes all points for the selected rarity.
Tips:
- Add several points on different parts of the question mark or item.
- Avoid quantity numbers, highlights, UI shadows, and transparent areas.
- If the program sells unrelated items, clear the points and select more unique areas.
- If the program does not find items, add more points on stable colors.
Other Items: is used to sell additional items that are not unidentified rarity items.
Examples: essences; potions; consumables; any items that drop often and fill the inventory.
In this section, the user creates custom item types.
How to add an item:
1. Click Add Item.
2. Enter a clear name, for example Essence or Potion.
3. Enable the checkbox for that item.
4. Click Add Point.
5. Click a stable area inside the item icon.
6. Add several points to make detection more reliable.
Other Items uses the same color point logic as rarities. The difference is that the points are taken from any custom item icon instead of a rarity question mark.
Important: Other Items is used only by Sell Bot. Melt Bot ignores these items and will not try to melt them. This is intentional because these items often cannot be melted.
Inventory - Melt Bot

Melt Bot melts items. It uses Sell Bot settings: inventory grid, selected Bags, selected rarities, color points, and Scan Level.
- Select Melt — coordinates of the smelter item in the inventory. Selected with a full-cell square. When started, the bot opens the inventory, switches to the first tab, and right-clicks this item to open the smelting interface.
- Melt Button — coordinates of the Melt button in the smelting interface.
- Run MeltBot — assigns the hotkey that starts melting.
Auto-Clicker
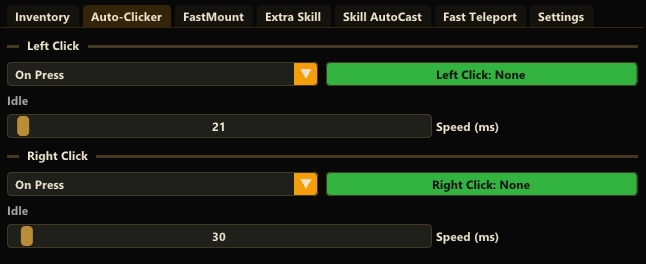
Left Click:
- Mode dropdown:
- On Press — clicking happens only while the assigned key is held down.
- Toggle — one key press starts clicking, the next key press stops it.
- Hotkey button — assigns the key for the left auto-clicker.
- Speed (ms) — delay between left clicks in milliseconds. Lower values click faster.
Right Click:
- Works the same as Left Click, but performs right mouse clicks.
- Mode dropdown:
- On Press — clicking happens only while the assigned key is held down.
- Toggle — one key press starts clicking, the next key press stops it.
- Hotkey button — assigns the key for the right auto-clicker.
- Speed (ms) — delay between right clicks.
Fast Mount
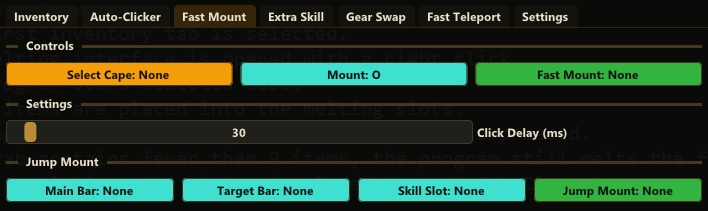
The Fast Mount tab contains two modes: normal Fast Mount; Jump Mount.
Normal Fast Mount is used to quickly swap the cape, summon the mount, and swap the cape back.
- Select Cape — selects the cell with the cape. The selection is based on the inventory cell, and the click is performed in the center of the cell.
- Mount — mount hotkey.
- Fast Mount — hotkey for starting the normal Fast Mount macro.
- Click Delay — delay between actions.
Jump Mount is an alternative mount method that uses a jump skill.
- Main Bar — main skill bar. This setting is shared with other modules that use Main Bar.
- Target Bar — the bar where the jump skill is located. If Target Bar is empty, bar switching is skipped.
- Skill Slot — jump skill key.
- Jump Mount — hotkey for starting Jump Mount.
Select Cape and Mount are taken from the main Fast Mount settings. They do not need to be configured again.
If Target Bar is empty, Skill Slot is pressed on the current bar without switching.
Extra Skill
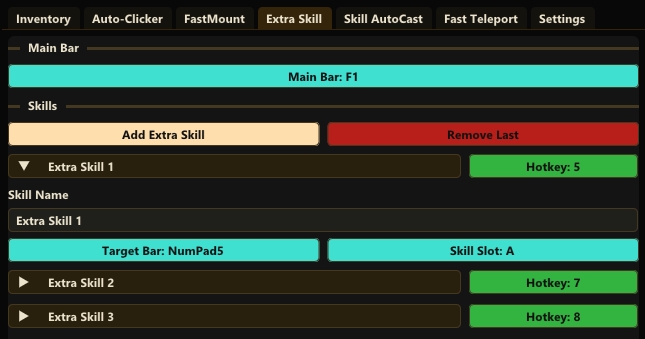
Extra Skill lets you create additional macros that switch to another skill bar, press a skill, and return to the main bar.
- Main Bar — the key for your main skill bar, where the macro should return after execution. For example F1.
- Add Extra Skill — adds a new Extra Skill. Maximum: 20.
- Remove Last — removes the last Extra Skill. Its saved hotkeys are removed as well.
Each Extra Skill is shown as a collapsible block. The right side of the block contains the hotkey that starts that specific Extra Skill.
Inside the block:
- Skill Name — custom name field. You can rename the macro, for example «Wolf Pet» or «Buff 1».
- Target Bar — key for the skill bar you want to switch to. For example F2. This key may repeat across different Extra Skills, because several skills can be placed on the same bar.
- Skill Slot — skill key to press on the target bar. For example 1, 2, W, and so on. This is not a macro trigger; it is a key pressed inside the macro.
Hotkey — hotkey that starts this Extra Skill. For example 9. When pressed, the bot performs:
1. Press Target Bar.
2. Press Skill Slot.
3. Press Main Bar.
Gear Swap
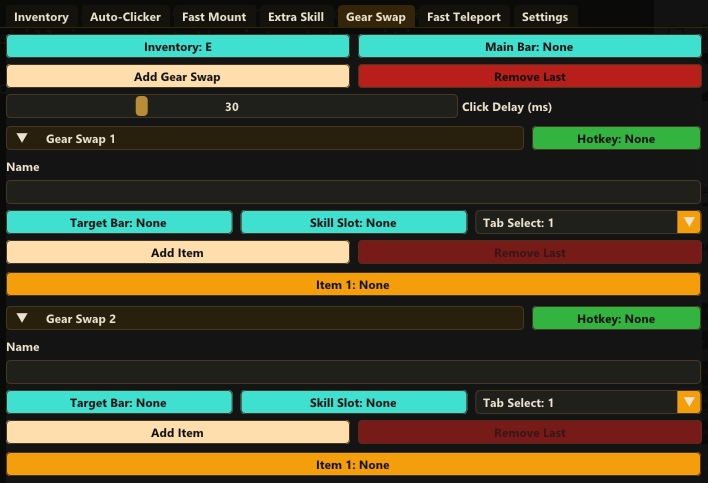
Gear Swap is a module for temporarily changing equipped items, using a skill, and switching the items back.
It is useful when the player wants to equip one or several items only for the moment of using a specific skill.
Top settings:
- Inventory — inventory hotkey. Shared with Inventory on the Inventory tab.
- Main Bar — main skill bar. Shared with Extra Skill, Fast Mount Jump Mount, and other modules.
- Add Gear Swap — adds a new Gear Swap macro.
- Remove Last — removes the last Gear Swap macro.
- Click Delay — delay between actions inside Gear Swap. Default is 30 ms.
Each Gear Swap appears as a collapsible block. The hotkey next to the block starts that specific macro.
Settings inside one Gear Swap:
- Name — macro name. The user can enter any clear name.
- Target Bar — the bar to switch to before using the skill. If empty, no bar switch is performed.
- Skill Slot — the skill key to press.
- Tab Select — inventory tab where the swap items are located.
- Add Item — adds an item to this Gear Swap.
- Remove Last — removes the last item from this Gear Swap.
- Item 1, Item 2, and so on — selected item cells.
How to configure Gear Swap:
1. Click Add Gear Swap.
2. Set a macro name.
3. Assign the macro hotkey.
4. Set Target Bar if the skill is on another bar.
5. Set Skill Slot.
6. Select the inventory tab with Tab Select.
7. Select the item cell in Item 1.
8. If there are several items, click Add Item and select the remaining cells.
When selecting an item, the program saves the center of the inventory cell, not a random click point. The UI shows this as a cell position, for example 2:4, where 2 is the row and 4 is the cell in that row.
If Target Bar is not set, Gear Swap does not switch bars and simply presses Skill Slot on the current bar.
Tips:
- Do not move selected items after configuring Gear Swap.
- If the game does not swap items reliably, increase Click Delay.
- 30 ms is usually enough, but slower PCs or server lag may require more.
- Test the macro in a safe place before using it in combat.
Skill AutoCast tab
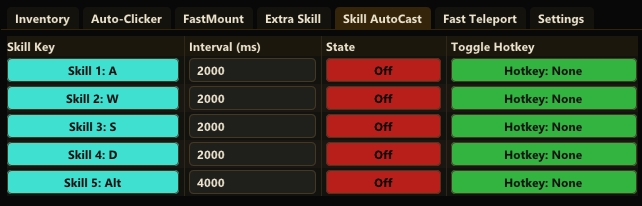
Skill AutoCast automatically presses selected skills at a configured interval.
The table has 5 rows, one for each main skill.
Skill Key — the in-game key for the skill. Defaults are 1, 2, 3, 4, 5, but you can assign any key.
- Interval (ms) — auto-cast interval in milliseconds. Examples:
- 500 — press every 0.5 seconds.
- 2000 — press every 2 seconds.
- 10000 — press every 10 seconds.
On/Off — enables or disables auto-cast for that specific skill.
Toggle Hotkey — separate hotkey that toggles this row without clicking the program window.
Important: each skill is enabled separately. If several rows are enabled, they run in parallel using their own intervals.
Fast Teleport tab
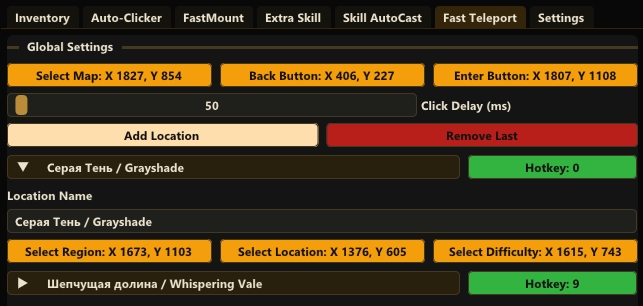
Fast Teleport lets you create custom teleport macros for different locations.
Global Settings:
- Select Map — selects the map item in the inventory. Selected with a full-cell square. The macro opens the map by right-clicking this item.
- Back Button — coordinates of the Back button on the map.
- Enter Button — coordinates of the Enter button for entering the location.
Click Delay (ms) — delay between the main teleport clicks. If the game does not open windows or accept clicks fast enough, increase this value.
- Add Location — adds a new location.
- Remove Last — removes the last location.
Each Location is shown as a separate collapsible block. The right side contains the hotkey for teleporting to that specific location.
Inside the block:
- Location Name — custom location name. You can enter any readable name, such as «Kingshill» or «Boss Farm».
- Select Region — coordinates for selecting the region on the map.
- Select Location — coordinates for selecting the exact location.
- Select Difficulty — coordinates for selecting the difficulty. DrakenHub clicks the difficulty several times with a fixed 50 ms delay so the game accepts the selection more reliably.
Settings tab
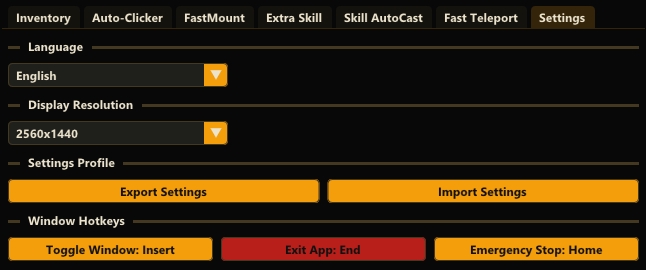
Language — Selects the interface language. Available languages are English and Russian. English is used by default.
Display Resolution:
- 1366×768
- 1920×1080
- 2560×1440
- 3840×2160
- Auto / Custom
When a preset is selected, DrakenHub applies prepared coordinates, grid settings, rarity points, and other parameters for that resolution.
On first launch, the program tries to detect the screen resolution and apply the matching preset. If the resolution does not match any preset, Auto / Custom is used.
Settings Profile:
- Export Settings — exports all program settings to a JSON file. Hotkeys, coordinates, grid, selected tabs, rarities, color points, Auto-Clicker settings, FastMount, Extra Skill, Skill AutoCast, Fast Teleport, and other parameters are saved.
- Import Settings — imports settings from a JSON file. Use this to quickly transfer a ready profile to another computer or another resolution.
Window Hotkeys:
- Toggle Window — assigns the key for hiding/showing the DrakenHub window.
- Exit App — assigns the key for fully closing the program.
- Emergency Stop — assigns the key for emergency stopping the active macro.
Exporting and importing settings
Export:
1. Open Settings.
2. Click Export Settings.
3. Choose where to save the file.
4. Send this file to another user or keep it as a backup.
Import:
1. Open Settings.
2. Click Import Settings.
3. Select the JSON settings file.
4. The settings will be applied to the program.
Export and import include almost everything that can be configured: coordinates, grids, color points, selected rarities, selected tabs, hotkeys, macro settings, and window size.
Tips for grid and rarity point setup
Recommended first Sell Bot setup:
1. Open the inventory in the game.
2. In DrakenHub, open Inventory -> Sell Bot.
3. Click Set First Cell and select the first cell.
4. Click Set Bag and select the first inventory tab.
5. Open Grid Settings and enable Show Scan Grid.
6. Adjust Cell Size, Cell Gap X, Cell Gap Y, Bag Size, and Bag Offset X until the red grid matches the inventory.
7. Select the required Bags.
8. Select the required Sell Rarities.
9. For each rarity, click Add point several times and add points on the question mark or stable colored areas of that rarity.
10. Open the shop or configure Shop Setup.
11. Run Sell Current Tab to test one tab.
12. If everything works correctly, use Sell All Tabs.
- If the bot sells extra items:
- Add more accurate points for the rarity.
- Remove bad points with Clear and set them again.
- Lower Point Picker Size.
- Check that the red grid matches the inventory cells exactly.
- If the bot skips items:
- Use Scan Level 2.
- Add more points for that rarity.
- Check grid and bag tab coordinates.
Emergency stop
If a macro starts doing the wrong action or you need to stop it immediately, use Emergency Stop. The default key is Home.
If you need to fully close the program, use Exit App. The default key is End.
This version of the program is now distributed on a paid basis.
- It is a one-time purchase with lifetime access, priced at 10 EUR.
For any questions, contact us via our website chat or Telegram